


Renovation Clients? Before/After Slider Tool3856
Pages:
1
 WGAN Forum WGAN ForumFounder & WGAN-TV Podcast Host Atlanta, Georgia |
DanSmigrod private msg quote post Address this user | |
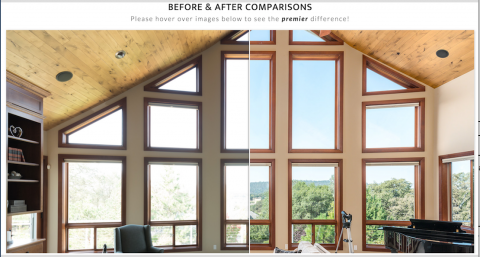 To see this slider in action, please click here. Hi All, Imagine including a slider on your website - your client's website - showing a "before" and "after": ✓ renovation ✓ virtual staging ✓ proposal ✓ demo your HDR photography (blown out windows versus ...) In this excellent post on the Photography For Real Estate Blog Thursday (9 February 2017) ... ✓ How Can I Implement a before and after Slider on My Website? ... the author - and readers - identifies these free tool: ✓ TwentyTwenty by Zurb ✓ EnvatoMarket Wordpress plug-in (example) ✓ Squarespace instructions using TwentyTwenty by Mass Exodus Do you know of other ways to accomplish this "before"/"after" slider effect? An iFrame widget? How else might you use this slider tool? Best, Dan |
||
| Post 1 • IP flag post | ||
|
|
UserName private msg quote post Address this user | |
| This is one of my favs (demo here). https://codepen.io/dudleystorey/pen/HkwBo Article about it here http://thenewcode.com/819/A-Before-And-After-Image-Comparison-Slide-Control-in-HTML5 It's free (the code's right there), it's responsive and only uses HTML5, CSS and a few lines of JavaScript. The heavy lifting is moved from the HTML into the CSS. It also has a slider control at the bottom of the image you can see and drag. My interests would like in showing how a photography service can improve a photo for you. For instance, I bookmarked a site last year where someone shows you how not to photograph homes you're trying to sell. One thing I'd like to try is to compare a still image to a video. That would let video fans show how much better a video is than a photo. And for photo fans to show how much better a photo is than a video. There seems to be a debate about that when it comes to showcasing a home. Imagine a still image of home's exterior. You slide the slider and as you do, you see a video gradually appear showing the SAME same scene only there you see clouds moving, trees waving in the wind, children playing in the yard, a dog running around and a caption saying, "Which one do you think would sell YOUR home faster? The photo or the fun" |
||
| Post 2 • IP flag post | ||
|
WGAN Forum Founder & WGAN-TV Podcast Host Atlanta, Georgia |
DanSmigrod private msg quote post Address this user | |
| @UserName Thank you for the additional resource for before/after and the (great) use case "wish list" slider of comparing a photo and a video. Would you like a slider for comparing a photo and a Matterport Spaces 3D Tour? In all the examples above, do you think it would be possible to do the slider with a widget that generated iFrame code? Dan |
||
| Post 3 • IP flag post | ||
|
|
UserName private msg quote post Address this user | |
| Great idea. Compare a picture of a Matterport Showcase model to something else. That something else could be a photo of screenshot of the same room. Then when users slide the slider, they can see what a regular image of a room looks like compared to what the same room would look like if it was in a Matterport Showcase model. As a user I still find these sliders interesting because they're like toys, and they can dramatically show the difference between two things. As we see in those images on that Premier Visuals page, those differences can be dramatic. If you created a slider widget that had an image of a Showcase model on one side, that Showcase image could optionally be marked up with arrows and things explaining things you can see in a Showcase model. Those might include way point markers, tags, the dollhouse icon, etc. The other image might be one that shows a regular VR tour that does not have those things. The widget would inform and show the differences between the two images. Images can also be live meaning, for example, hovering over something in an image could trigger an action such as an explanatory tool tip popup. Since an iFrame can hold a Matterport model, a YouTube video or even a game, it can alos hold a simple image slider widget. <iframe src="x.html"></iframe> That's a basic iFrame tag. "x.html" is the name of the Web page you want to appear in the iFrame. In this instance, that Web page could be the HTML document containing the code that generates your slider widget. You could then position the widget (iFrame) anywhere you want on the Web page just like you can position a Matterport model. And, just like a Matterport Showcase iFrame, the slider widget could be any size depending on the height and width values you assign in the iFrame tag. And, you could make a Web app that generates the iFrame based on parameters you supply, like the names of your two images. However, the code is simple enough to where anyone could figure out where to place their image URLs. As an alternative, the HTML that holds the iFrame could accept parameters like the ones you pass to Matterport when you assign different parameters in your Showcase iFrame code. The Javascript in the widget would have to be enhanced to accept those parameters and adjust the widget accordingly. As always, the old <object> tag is still working and not deprecated. Instead of using an iFrame, you can test that now by putting a Matterport model's URL inside an object tag. The model still runs -- no iFrame needed. Folks used to use iFrames and object tags in the old days to create and distribute widgets. Today, you mostly see iFrame usage since it's more secure if your iFrame is coming from a server that's not your own. |
||
| Post 4 • IP flag post | ||
|
WGAN Forum Founder & WGAN-TV Podcast Host Atlanta, Georgia |
DanSmigrod private msg quote post Address this user | |
| @UserName Most helpful. I will see if we can create a "before"/"after" slider widget to offer to Forum Members free. About comparing a photo to a Matterport Space, do you think it is possible to change the photo to match with the 3D Tour view? This way, you see that the photo is an edited view of the space? Or, as long as the first image of the 3D Tour matches the still imagine, that is sufficient? Dan |
||
| Post 5 • IP flag post | ||
|
|
UserName private msg quote post Address this user | |
The only difference between a photograph of a room and the room viewed in Matterport seems to be the controls that appear on top of the model, as seen here ..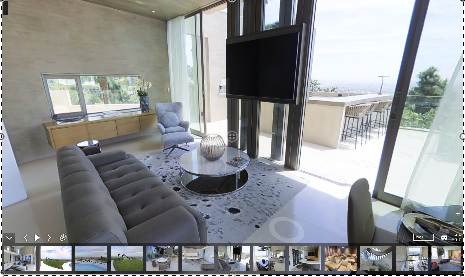 Take away those controls and thumbnail images, and there's your "BEFORE" photo. If the goal is to show how a Showcase model looks with all controls visible, you could compare those two photos. Note that the photo also shows a white way point circle in front of the couch and to the right. Many people might miss seeing that way point. If you annotated the model photo, you could explain what the controls and waypoints are using arrows and short text descriptions. With annotation, users would learn the benefits of using a Showcase model vs using a plain photo. So, if you make all those controls go away and take a screenshot, you get your "Before" image. The only problem I've found is that a simple click and hold with the mouse doesn't make the controls disappear. I have to move the mouse slightly as well. If you do that, the Before and After images won't be the same anymore. One way to make the controls disappear is to view a model, open your browser's Developer tools and set the display value of each icon (div) to none. You could create a short Javascript that makes the controls all disappear so you could take your "AFTER" screenshot. Maybe Matterport already has a photo of that opening image. == As a user, I wouldn't mind seeing the "After" image do something. For instance, you could make the AFTER image alive and informative by making an annotation fade in over a control icon. For instance, one annotation might appear above the eyeglasses icon and read, point to the eyeglasses "A click here launches VR mode." After that annotation faded, another could appear somewhere else that explained another part of the UI. As the user played with the slider, he/she would learn what a model's benefits were and how to use the controls before ever launching a model. Here's what an annotation above the "Floor" selector control might look like after it faded in briefly .. 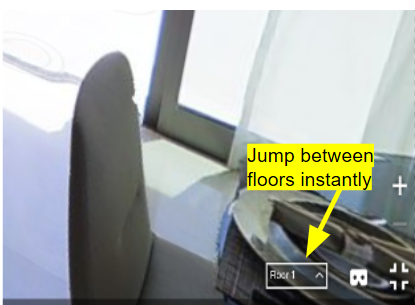 This type of animated annotation would be possible because the browser knows the location of each one of those divs that holds a control's icon, such as the fullscreen icon. The widget wouldn't even have to access the Matterport SDK to get that information. All code would lie in the widget so like with MatterPlus, Matterport developers wouldn't have to code anything. It would almost be like a commercial in a widget that happens to be a slider that compares a still photo to a Showcase model. A user might stick around playing with the slider if all this was going on. |
||
| Post 6 • IP flag post | ||
Pages:
1This topic is archived. Start new topic?