


3D space blotchy and messed up2046
Pages:
1

|
BabluN private msg quote post Address this user | |
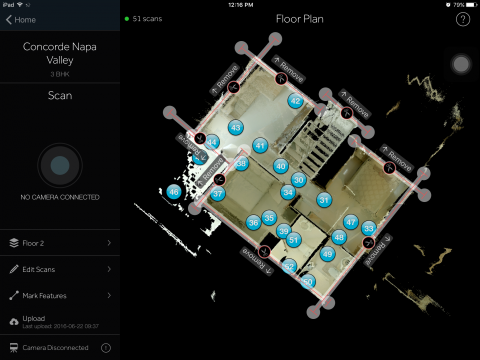
| Hi, Could you please take a look at this model and tell me what I could have done better? If you notice the balcony on the second floor has been trimmed with the intention that it would not show up in the floor plan of the space. But it still does and the dollhouse is pretty messed up.....please advice? https://my.matterport.com/show/?m=Lyuz6bh54xj |
||
| Post 1 • IP flag post | ||

|
JonJ private msg quote post Address this user | |
| It looks like the trim line near scan 37 is too long. I will also tell you that your trim lines are too close to the walls. In the dollhouse view, some of the exterior walls are not visible because they have been trimmed out. Finally, you should trim out the staircase that is leading to the 3rd floor completely. It will give a much cleaner look. | ||
| Post 3 • IP flag post | ||
|
|
BabluN private msg quote post Address this user | |
| Hi Jon, Thank you, but when you say that the trim lines are too close to the walls, do you mean that I should be trimming a bit more inwards of the interior of the house? |
||
| Post 4 • IP flag post | ||

|
JohnBecker private msg quote post Address this user | |
| Just the opposite - trim lines should go just *outside* the exterior walls. If you trim too close, you'll wind up with disappearing walls in the walk-through view. | ||
| Post 5 • IP flag post | ||
|
|
JohnBecker private msg quote post Address this user | |
| Are we supposed to be able to walk up to the third floor? | ||
| Post 6 • IP flag post | ||
|
|
BabluN private msg quote post Address this user | |
| @JohnBecker, nope, the third floor leads to the terrace. I usually don't scan and include the stairs to terraces. Also, do you guys think that the issue with the trim lines not doing what it's supposed to do is just a one time thing in this particular model? | ||
| Post 7 • IP flag post | ||

Regina, Saskatchewan Canada |
Queen_City_3D private msg quote post Address this user | |
| Trim line by scan 42 is a definite problem. You'll likely want to move it away from the wall a bit more to the outside and it also looks like its encroaching on your staircase and trimming away part of the model there. Also the other trim line behind the couch on the other side is also too far in and should be moved outside. It's cutting off some of that wall behind the couch. For that matter, the trim line behind the Master bed is also too close in, as is the other wall in that room. I think you need to adjust your trim lines and re-process the model and you'll be surprised at how cleaned up it is. |
||
| Post 8 • IP flag post | ||
|
|
BabluN private msg quote post Address this user | |
| @Queen City 3D. Thank you, you've always been very helpful.....! | ||
| Post 9 • IP flag post | ||

|
Property3dNZ private msg quote post Address this user | |
| @BabluN Hi there! It seems that you haven't added any windows in either... is there a reason for that? |
||
| Post 10 • IP flag post | ||
|
|
BabluN private msg quote post Address this user | |
| @Property3dNZ, I remember reading somewhere that you don't need to trim if you've marked the windows, so I've assumed that it would work the other way round as well, since I've trimmed, there is no need to mark the windows. What are your thoughts? | ||
| Post 11 • IP flag post | ||
|
|
JonJ private msg quote post Address this user | |
| Here is something i wrote in a previous thread about windows. There are a number of reasons to mark windows that are apparent in the final product. 1) If you mark the window, in the dollhouse view, the image on the window will be fixed. It will not change as though you are able to look through the window into the yard or patio space. This would be the desired effect if there are no scans on the opposite side of the window. If the window was not marked, often times they will appear as black holes in the dollhouse view, even though you are able to see the geometric images behind the window. For an unmarked window, the image framed in the window will change as you "look through" the window at various angles (rotating the dollhouse) 2) Marking a window will also prevent the movement "through" the window while navigating in the first person view. This is usually the desired effect if the glass surface is a true window, but not if it sliding glass door or door to a shower. 3) It also helps during the alignment process as it tells the software that the image that is "framed" behind a window will change depending where the camera is placed in front of the window. For instance, if the camera is placed directly to the right of a window, it would not see any objects that are directly on the opposite side of the wall. However, if the camera is moved to the left side of the window, the objects that were previously obstructed by the wall are now visible. By marking the window, it helps by telling the software why this new geometry is now visible. I hope this makes some sense/helps. Thanks, Jon |
||
| Post 12 • IP flag post | ||
Pages:
1This topic is archived. Start new topic?