


Help me clear up the use of the trim tool in Matterport13785
Pages:
1|
|
tubazoltan private msg quote post Address this user | |
| Hi, I have just started using Matterport, have done a couple of scans, and can not seem to get a hang of how the trim tool is supposed to be working, or what the logic is behind it. Here is what I think: A trim line in my mind is the top-down view of a vertical trim plane (an infinite plane that is, so it doesn't end where the trim line ends). All data on the "remove" side of this plane will be excluded from the model. If for example I have a trim line set up the following way: 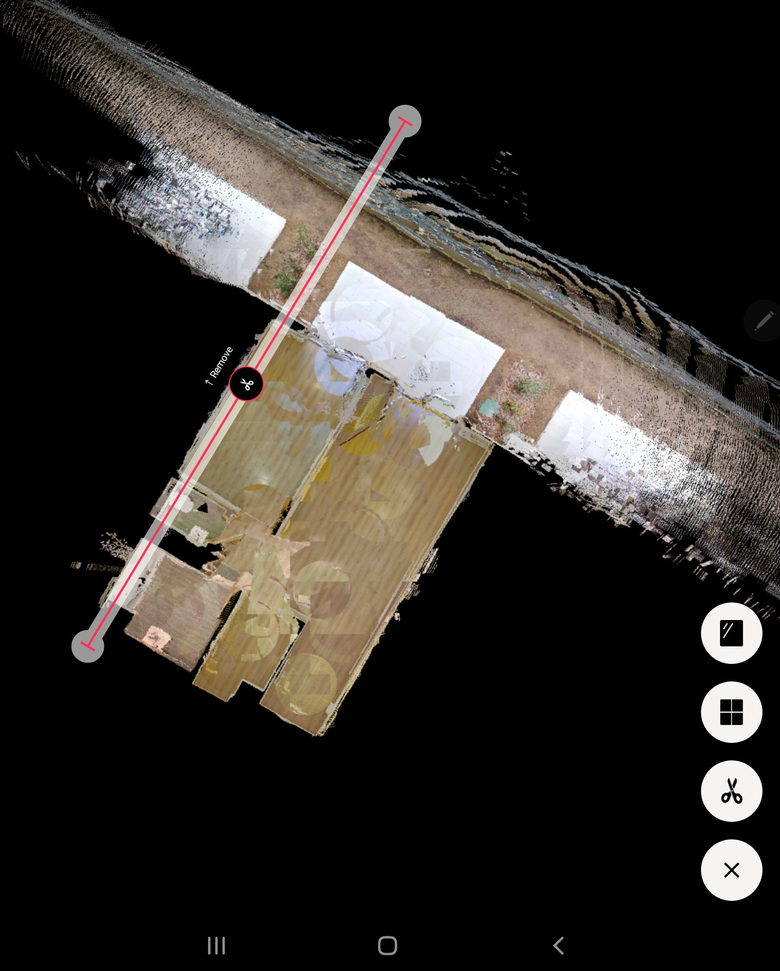 I would expect the following result (sort of, as I just made this up in Photoshop for illustration purposes, but you will get the idea): 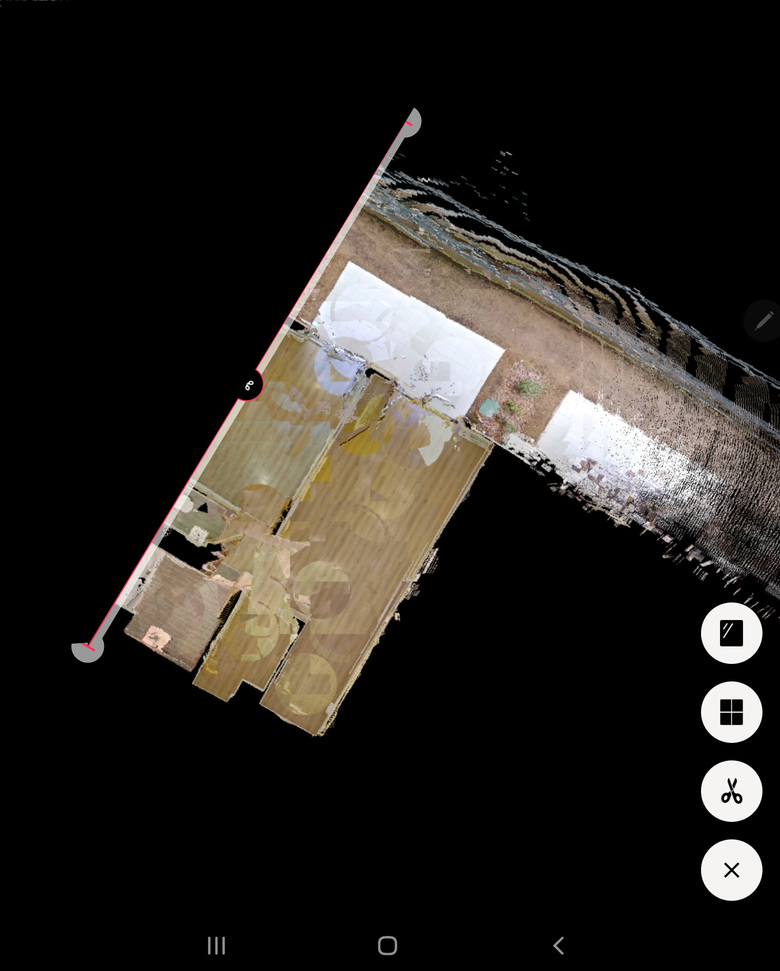 But it doesn't seem to work this way. I have scanned a flat, and set up my trim lines the following way: 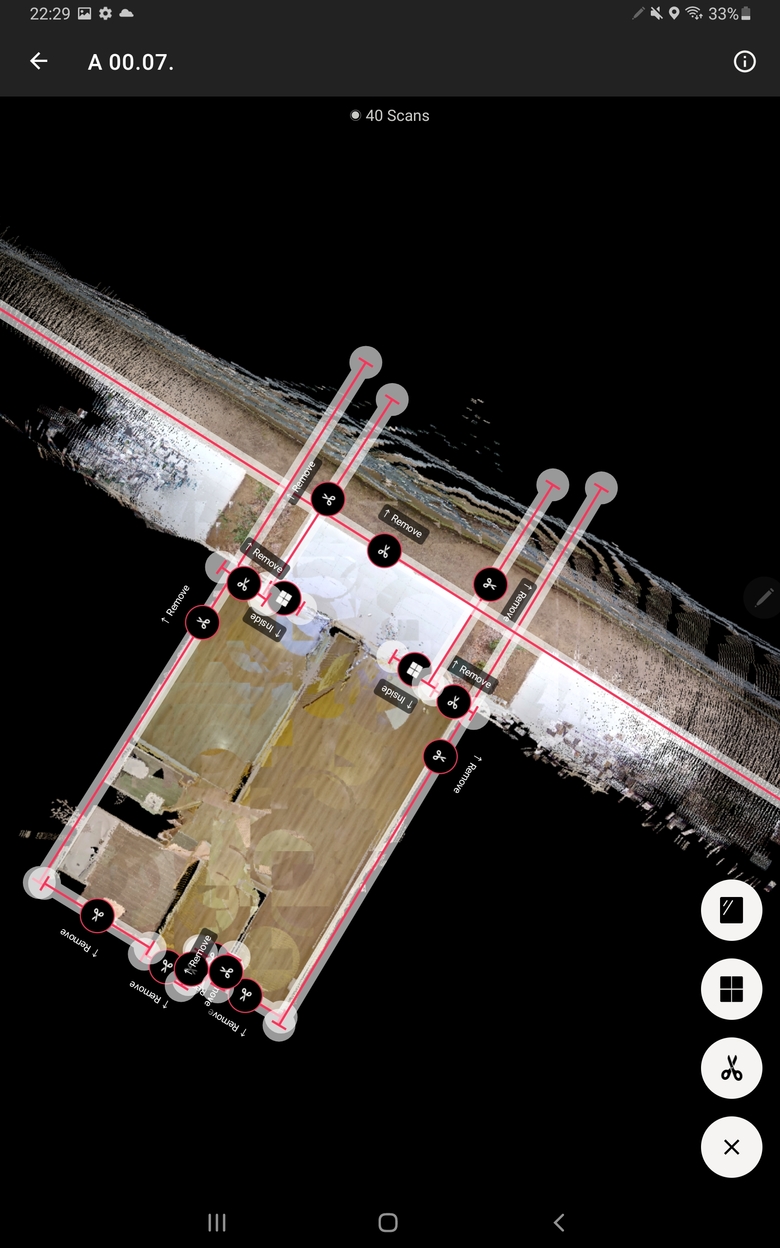 The resulting dollhouse looks like this: 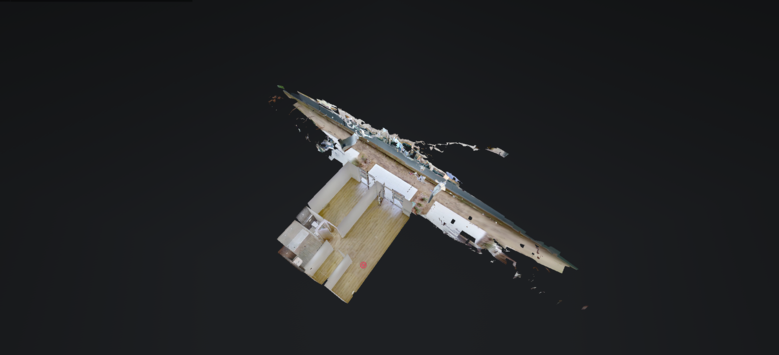 This is obviously not good, so I would like to crop the unnecessary parts of the model inside the area that I have encircled in red: 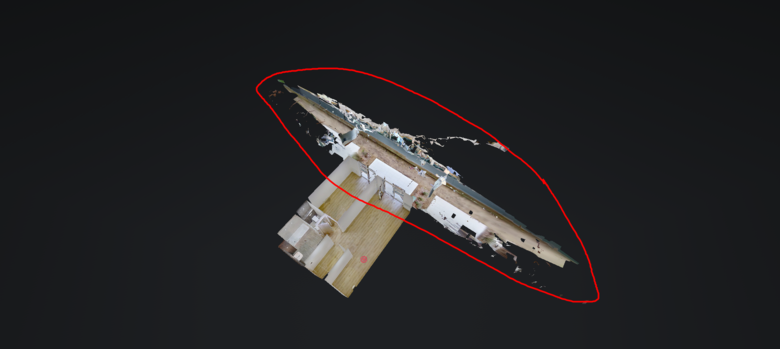 First I tried this: 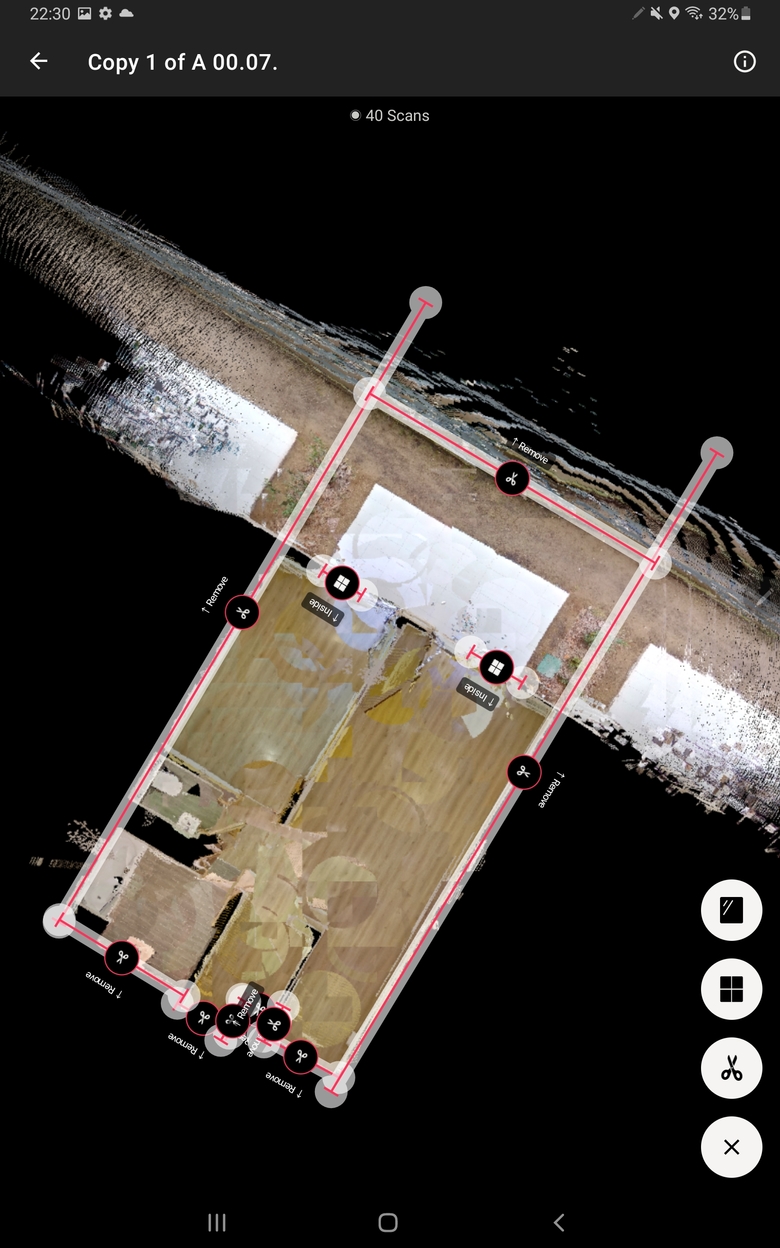 The result is this: 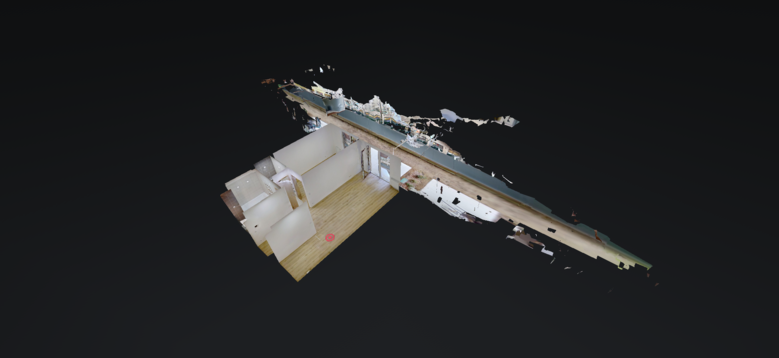 Then I tried it this way: 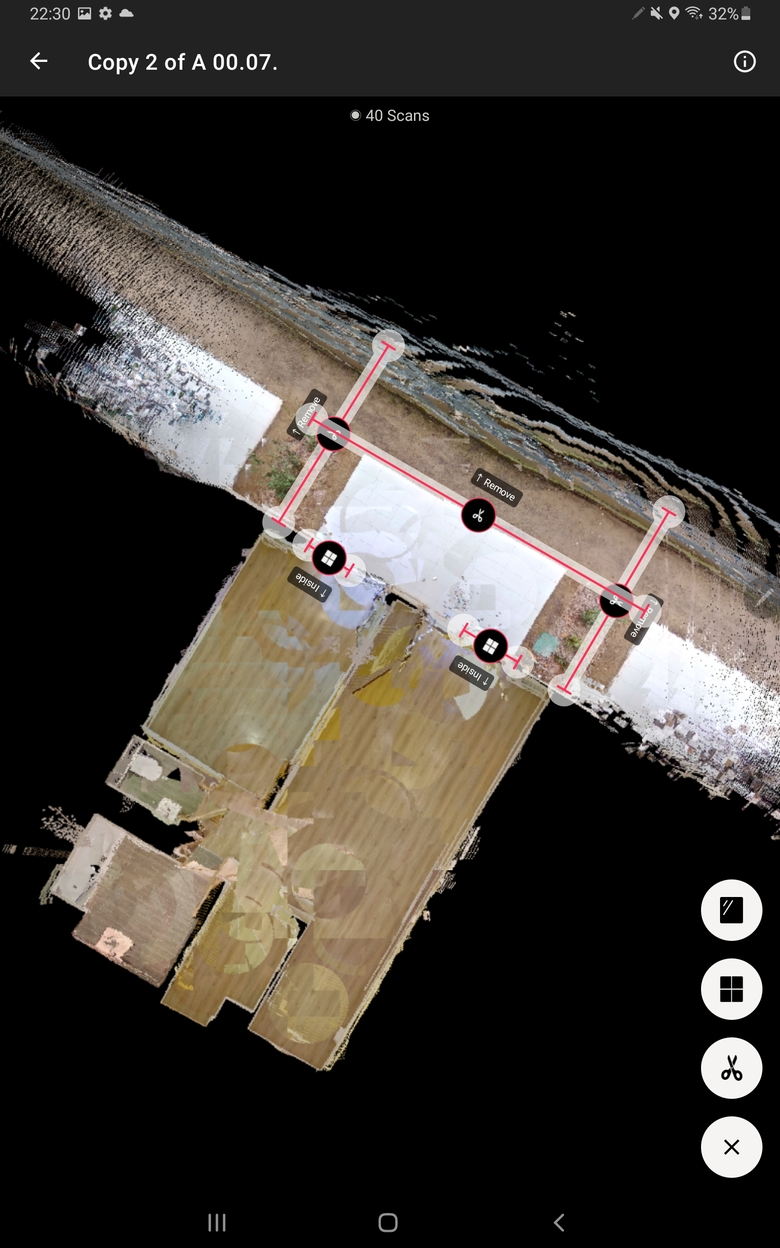 The result is this: 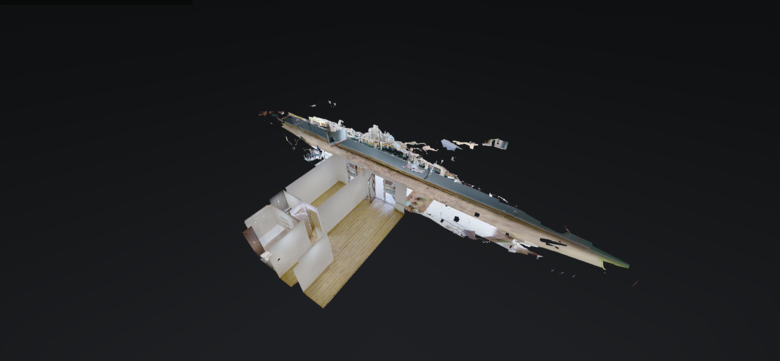 So no change basically. Can anyone explain to me what I am not understanding? How do these trim lines work, and most importantly, how do I get rid of all the scatters on my model? I will be thankful if someone can help me out with this. Zoltán |
||
| Post 1 • IP flag post | ||
|
|
ron0987 private msg quote post Address this user | |
| I do not see enough from your sample, I cannot see if you have physical scan point outside the trim lines. If you do then there is one issue. Again I cannot see the whole scan to see exactly what is beyond the trim lines, in some cases if this is a high wall the trim line has some height limitations. So these can be two reasons. If you can send a screen shot of the trim lines with scan points it would help. | ||
| Post 2 • IP flag post | ||
|
|
tubazoltan private msg quote post Address this user | |
| This one I did forget to clarify: in my first try there were a few scan points outside or intersecting with the trim lines. But in the second and third try I paid attention to this. There are no high walls, the problematic part is outside. I can upload larger and more detailed pictures tomorrow. Here is the tour until then, this is my original try: https://my.matterport.com/show/?m=EaDo3ZHNMhF&brand=0 |
||
| Post 3 • IP flag post | ||
|
|
ron0987 private msg quote post Address this user | |
| Can you take screen shot of Ipad showing all scan points with trim lines. If you look at doll house there items scanned that are elevated and you can see those points which may cause some of the issues but should not be the complete issue. No high walls but there is the building across from the unit that you scanned. You again can see the points in the 3D doll house view. | ||
| Post 4 • IP flag post | ||
 WGAN Fan WGAN FanClub Member Queensland, Australia |
Wingman private msg quote post Address this user | |
Quote:Originally Posted by ron0987 I agree with it and moreover I have had a similar problem. I left a scan on a trim side and then I could not figured out for some time why it was not trimming. I would also check for hidden scan points behind trim lines. They may be a reason why something not trimmed with trimming lines. |
||
| Post 5 • IP flag post | ||
|
|
tubazoltan private msg quote post Address this user | |
On the following image you can see the scan points, and also the trim lones from my original try, I can see myself that there are problems with scan points being outside the trim lines: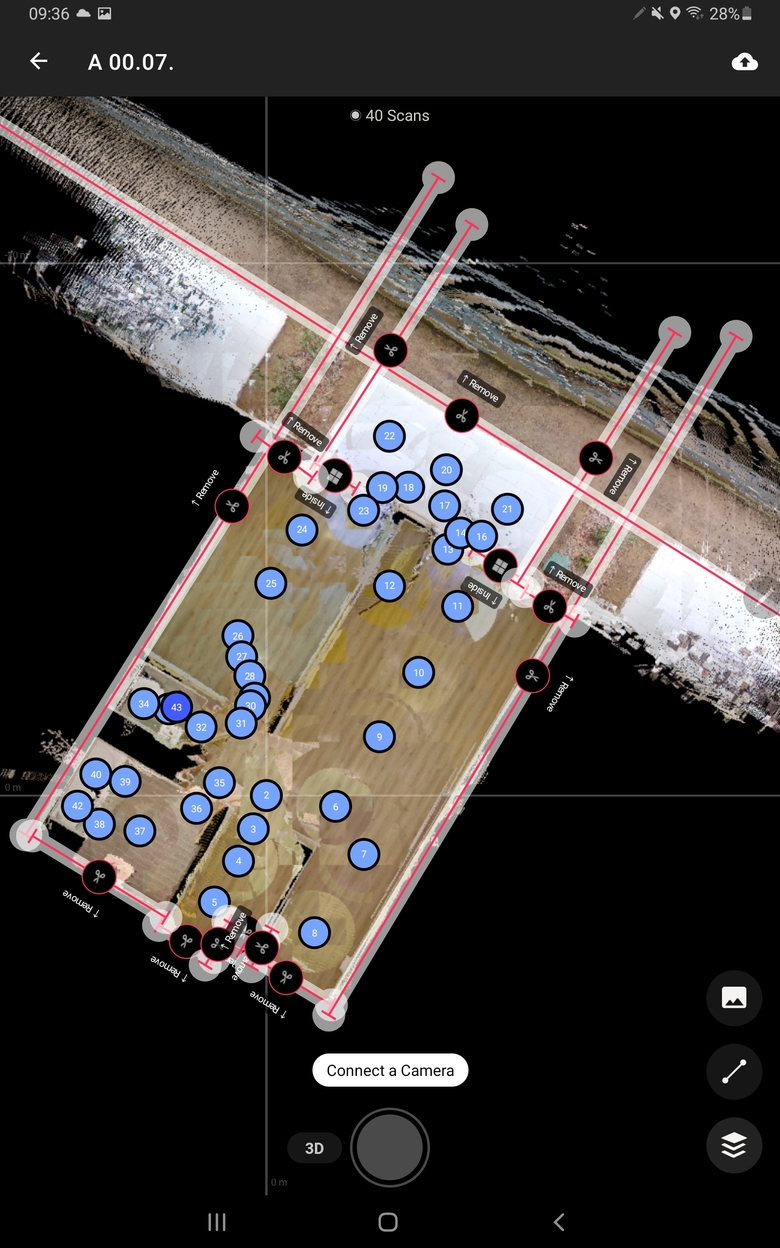 Let's just skip my second try, and go to my last try. Here are the trim lines and the scan points: 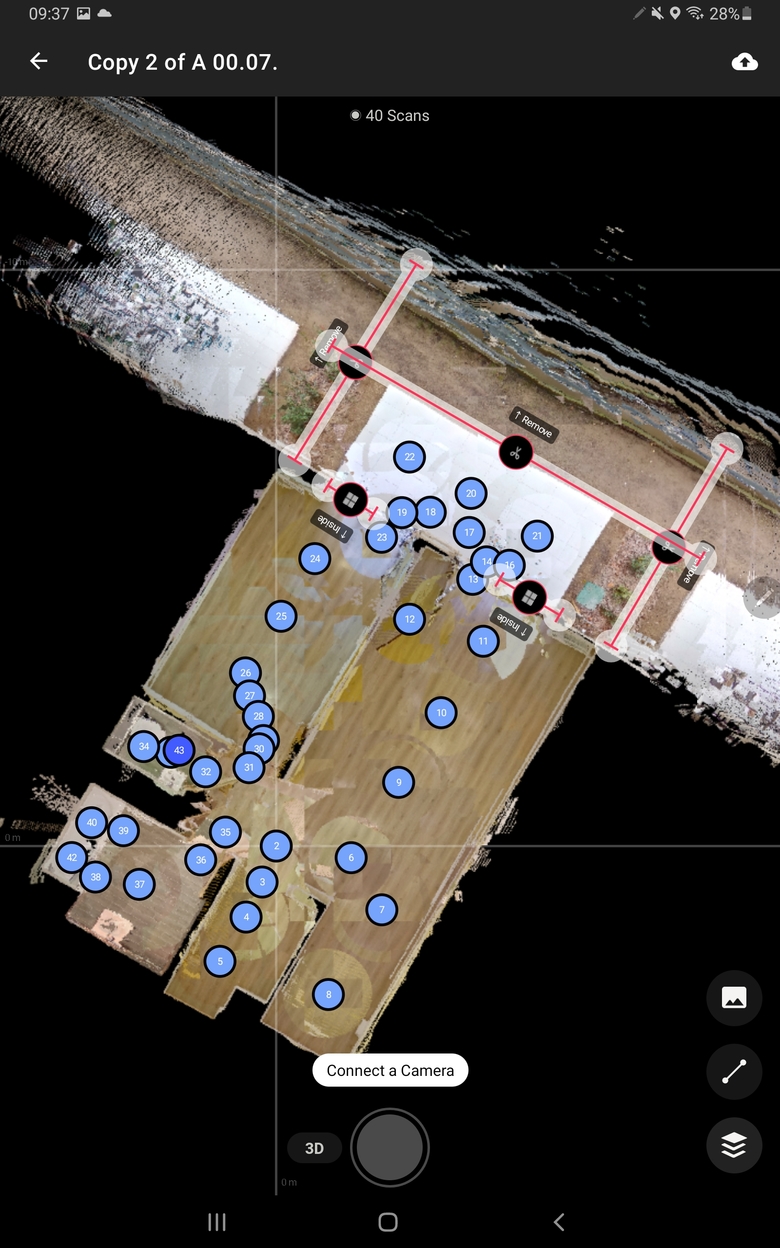 I can imagine scan points 34, 40 and 42 to be too close to the axis of the top left trim line. But the other two trim lines do not have any problems, and they are still not trimming. Zoltán |
||
| Post 6 • IP flag post | ||
|
|
tubazoltan private msg quote post Address this user | |
| So, I decided to go back to the basics. I have set up a new sample. Below you can see my two trim lines. They do not intersect/overlap/interfere with any scan points: 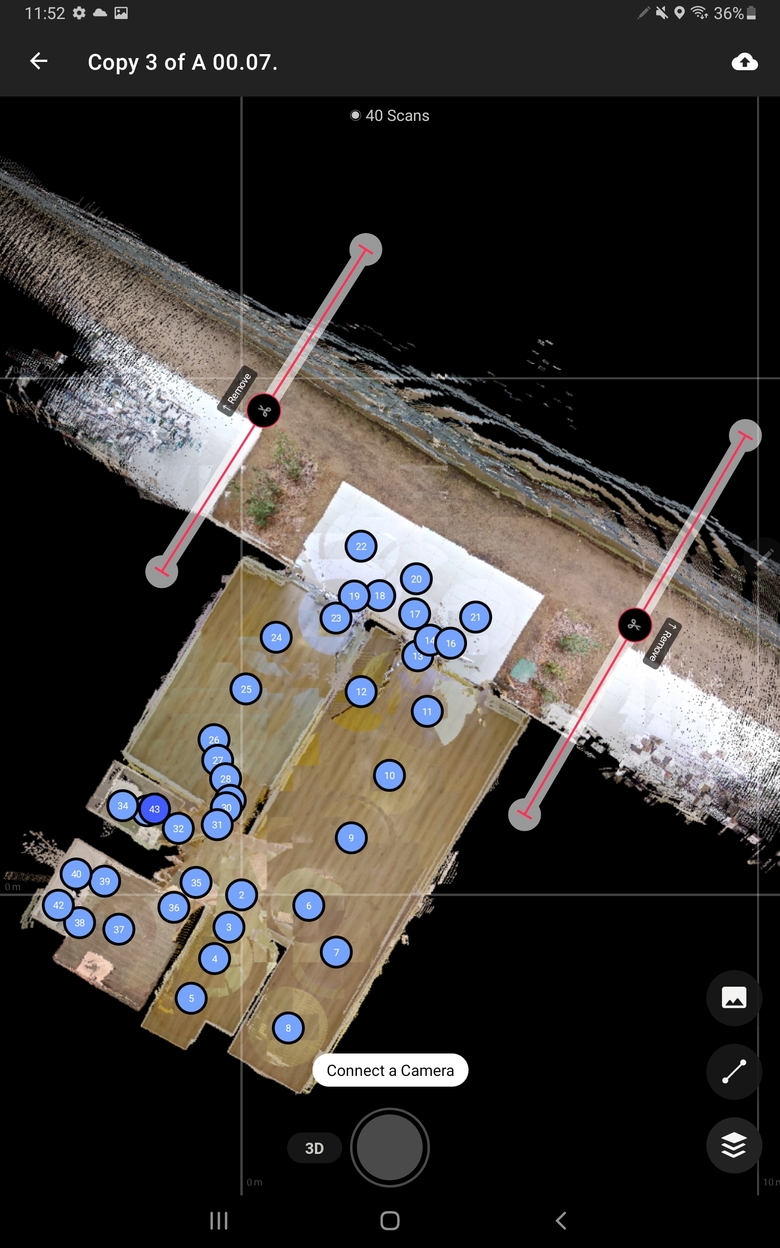 The resulting model is this: https://my.matterport.com/show/?m=ET6n97M6HGD How is this possible? How can I crop the two extending parts of the model? Zoltán |
||
| Post 7 • IP flag post | ||
|
|
ron0987 private msg quote post Address this user | |
@tubazoltan This is what your trim should look like in my opinion for your model.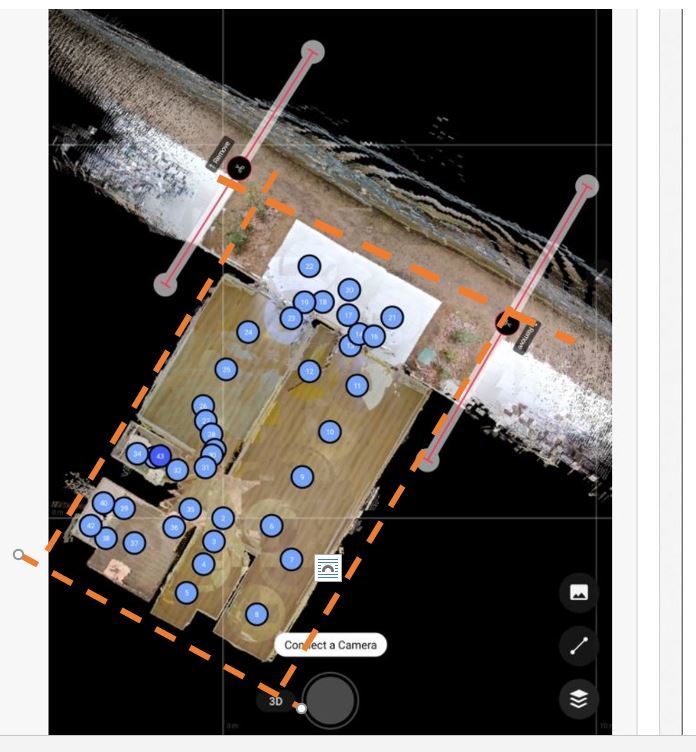 Four lines look at the orange dashed lines. They have to overlap in the corners with trim pointed outside. Very seldom do I say there was over scanning but there is a lot of scans on the deck. I could not get a screen shot of the 3d model to show you the areas of the scan that there were points outside the limitations of the trim tool. Start with just four trim lines and reprocess. |
||
| Post 8 • IP flag post | ||
|
|
ron0987 private msg quote post Address this user | |
| When I talk about over scanning on deck I count 9 scans but when the MP link was working I only saw three hot spots. For ever scan that is captured the 3D model is built on, When I looked at the 3D profile you could see the wall on the outside of the building above the unit you were showcasing. That goes back to the limitation of the height limitation on the trim tool. But I could also see data across the street, that 3D is not being trimmed out with the trim tool and because of the limitation of the trim tool you may never be able to remove that. It would require MP to get involved. Hopefully this helps. | ||
| Post 9 • IP flag post | ||
|
|
ron0987 private msg quote post Address this user | |
Matterport back up so this is what I see in the 3d version, I believe the data collected is outside the limits of MP. If your familiar with true CAD trim which is an infinite 3D trim MP has a height limitation that allows data to be processed and causes you the issues you are having.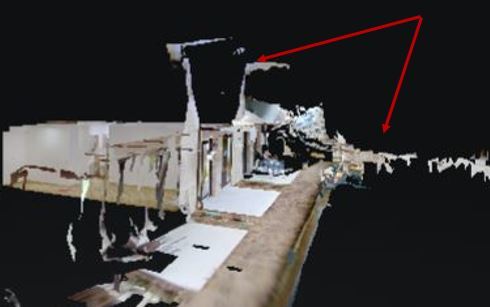 Again this may not help but it gives you an idea what is going on. |
||
| Post 10 • IP flag post | ||
|
|
tubazoltan private msg quote post Address this user | |
| Hi, Sorry for the delay, I kept in trying different solutions, but to no avail. Heres is the crop you suggested: 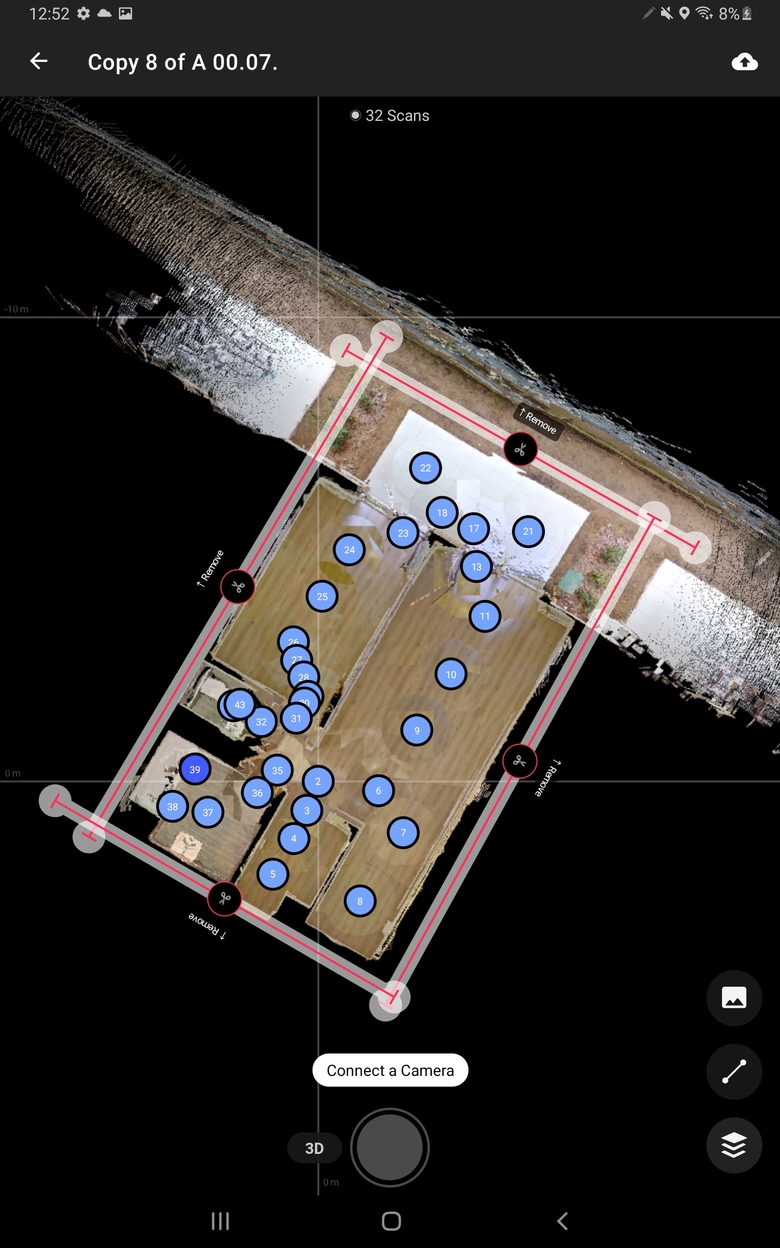 And this is the result: https://my.matterport.com/show/?m=nUGu481eRBH I am stuck at this point, but am glad to try any new ideas that anyone comes up with, or at least would be thankful for an exact explanation of what is going on - if anybody happens to know. Zoltán |
||
| Post 11 • IP flag post | ||
|
|
ron0987 private msg quote post Address this user | |
| I have never seen the trim fail to this extent. You might try one other thing leave the trim lines as is but on the exterior deck area add a mirror on the inside of the trim line facing the scan points. This also tells the software to ignore data behind it. Did Matterport have any suggestions? | ||
| Post 12 • IP flag post | ||
|
|
tubazoltan private msg quote post Address this user | |
| I have just written to Matterport support, and am very curious to what they will say. I will try your suggestion. Zoltán |
||
| Post 13 • IP flag post | ||

|
wishing_well private msg quote post Address this user | |
| Have you tried boxing in all the deletion areas? I've had this problem and ended up creating lots of boxes with the arrows pointing inwards, with all the areas for deletion within the boxes. I've also found that extending the lines very far over any splash makes a difference in the results sometimes. | ||
| Post 14 • IP flag post | ||
|
|
tubazoltan private msg quote post Address this user | |
| @wishing_well I have tried boxing in the deletion areas, and it didn't change anything. But your solution with the mirros does work sort of. Here are my lines: 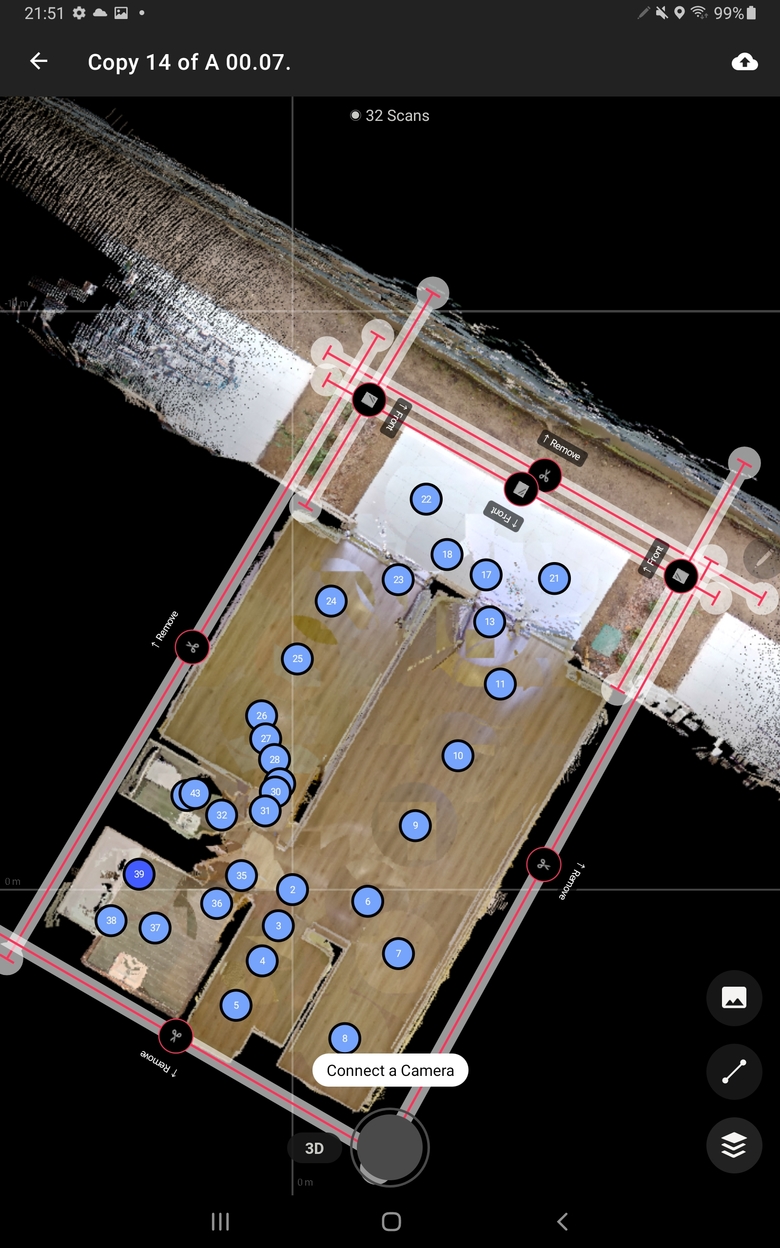 And this is the resulting model: https://my.matterport.com/show/?m=5JgaSV6wKsT So it is a sort-of-solution, but I would be happy if I could remove the "view from the patio" from the dollhouse. But anyway, thanks, this idea did save me, as Matterport didn't bother to answer (yet). Zoltán |
||
| Post 15 • IP flag post | ||
|
|
ron0987 private msg quote post Address this user | |
| I am glad that helped. | ||
| Post 16 • IP flag post | ||
|
|
wishing_well private msg quote post Address this user | |
I think any further trimming you need can be achieved by removing these scans and re-uploading the model. You can make a duplicate of the model first and then remove the scans in the duplicate to trial how it will look. Most of the splash will be coming from them. 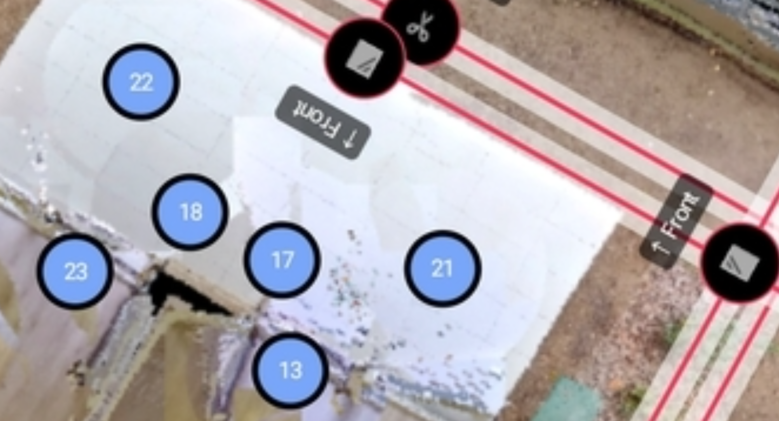 |
||
| Post 17 • IP flag post | ||
 MatterTag MatterTagExport-Import Service Lower Hutt, New Zealand |
HomePlanNZ private msg quote post Address this user | |
| I think you are right to contact support, but I would try duplicating the original model, delete all trims, use the repair tool, then redo the remove trims and try processing again. Don't recommend having 2x remove lines as you did originally that 'overlap' in what they are telling MP to trim, I've seen it get confused. We trim exterior scans all the time and they always work, so a bit of an odd ball problem! | ||
| Post 18 • IP flag post | ||
|
|
tubazoltan private msg quote post Address this user | |
| Hi, I didn't want to leave this thread hanging in the air, so here is what I have managed so far: currently I am using the "mirror method", which is not perfect, but results in a tidy looking 3D model. @HomePlanNZ: Thank you, I will try this in the future, but can you help me where the "repair tool" you mention can be found? I have received the following answer from Matterport support: "I've taken a look at the space in question. The Exterior scans capture a far distance as well as the portions of the buildings. Trim markings are meant to be placed at the exterior perimeter of spaces and built to remove spray or other small artifacts on the outside of structures. The areas as captured cannot be trimmed out as such." Zoltán |
||
| Post 19 • IP flag post | ||
|
|
ron0987 private msg quote post Address this user | |
| This is what I was talking about the limitations of the MP trim line. I wish they would make trim work like a typical CAD program. If it would work like that then your problem be resolved. | ||
| Post 20 • IP flag post | ||
Pages:
1This topic is archived. Start new topic?